Tuesday, March 22, 2011

A copycat vegetable garden... part1.

So work has been pretty hectic lately. I LOVE LOVE LOVE my new job. Getting to work with kiddos on the weekends, teching them about the love of an amazing savior is the most rewwarding endeavor this side of parenting i have ever encountered! I just completely underestimated what juggling a job and family would be like (even part time). After nearly a decade of doing my own thing, it's taken quite an adjustment to being on someone else's timeframe. (Or many someone eles's for that matter)

As you can see, my blog time has suffered. I am sorry to neglect you. If it feels like i have forgotten you- I haven't. I promise. You are there in my dreams... now if only I could sync my dreams with this blog, we'd be flyin high!

There are so many crafting projects just screaming to be finished right now. (in fact they are all piled in the trunk of my car) You moms know that a mom's trunk is just about the only place the kiddos won't plunder and destroy right? Or are my copykittens especially destructive?

Anyhow, spring has sprung at chateau copycat and it has brought the itch to garden. So, in a feeble attempt to scratch the gardening itch I am daring to plant a vegetable garden. (Currently Mr.Copycat is cursing in the living room as he attempts to plot my front yard to scale on graph paper, so I can try to design my garden. He loves me. This I know.)


Today I planted my first batch of seeds in a table top green house and hopefully in a few weeks I will have seedlings. For now, I just have to be content to dream about the type of garden I want. Ever the optomist (so far the only thing that grows at my house are the kids and they are pretty insistant about letting me know their needs! ) I started looking at renaissance vegetable gardens. Here are a few examples:


Now, I am fully aware that the chateau copycat is no castle. I am also aware that I have nowhere near the amount of space that these gardens require but I have been reading. I have been reading this little darling of a gardening book called square foot gardening that gives me hope that I may be able to accomplish this similar style in a more humble space to a similar effect. In true copy cat fashion, I am aspiring to make a square foot renaissance vegetable garden in my front yard. (Do you think I am crazy?) Heres what my front yard looks like currently:


I think this blank canvas is just begging for a pretty addition that also saves on my food budget (And increases my design budget in the process!!!) I'll keep you updated on copycat gardens as we progress. Till then- have fun. stay crafty. C.

Wednesday, March 16, 2011

March CopyCat: Restoration Hardware Faux Belgian Linen

There is just something so irresistibly crisp and comfy about Belgian linen. Maybe its the understated cool- its casual texture and warmth. Perhaps it has a way of looking so polished and relaxed at the same time. So very Hemingway meets Casablanca. I love the neutral palate and the mottled flecks of dark and light fibers woven throughout. I love texture and Belgian linen is a linen you can feel as you look at it. I believe it is safe to say I love everything about Belgian linen...except its price tag. These yummy curtains on the left are from Restoration Hardware and will set you back $104.99- $599.00 (And that's their sale price!)


Seeing as I am the kind of person who would rather, um, eat for the month than buy delicious Belgian linen curtains; how would you like to learn of a super cheap, super, easy, just as luxurious way to duplicate these darling gems? What would you say if I told you you could have luxuriously long, spill on the floor in extravagant piles, faux Belgian linen curtains for just 10 bucks a piece?


Its true. Let me introduce you to my dear friend, who will make repeat appearances in this blog I assure you: Painters Drop Cloth. Because of its cost effectiveness, durability and versatility, it is a Copycat essential and it is my personal belief that no designers tool box should ever be without it.

You can get painters drop cloth at your local hardware store. I buy mine at Walmart. Just 10 dollars for a pre-hemmed on all sides, 9' x6' sheet.


One you get these beauties home there are many ways you can handle them to transform them into your masterpiece. Some prefer to wash them in loads upon loads of fabric softener and dryer sheets. Some like them pressed and proper. I love their folds and creases so I just shake them out and clip them to the curtain fasteners, hang them from the rods and let them puddle on the floor.

Here are a few pictures of my DIY faux Belgian linen (drop cloth) curtains.

So what have you used painters drop cloth for? I'd love to know!

Tuesday, February 15, 2011

DIY Chalkboard Paint

Remember my recent post admitting my new found lust for all things chalkboard? Well, Mr. Copycat and I took a stroll through our local hardware store today and I asked the kind gal behind the paint counter where the gallons of chalkboard paint were located. She kindly chuckled at me and said, "Its not sold by the gallon. Its only sold by the quart."
"Uh oh." I thought to myself. (Since I never think of anything on the small scale. I had envisioned an entire twenty foot wall covered with the paint! Go Big or Go home, right?) "I'm going to have to sell a kidney."
"Its fifteen dollars for a quart" she said as she shattered my chalkboard dreams into a million of teeny-tiny slate pieces.

Not being one to give up easy or to pay crazy money for design I left the store thinking- where there's a will there's a DIY!!! And so.... here it is:
A tutorial on how to make your own chalkboard paint...
whatever brilliant color your little heart desires... at a fraction of the cost! Read on to learn how to make chalkboard paint yourself.

Things You'll Need:Latex paint with a flat finish (amount will vary based on the painting project)
Unsanded tile grout.
Container
Paintbrush, roller or a sponge
Paint stirrer
150 grit sandpaper
Chalk
Felt cloth
Dampened towel or sponge
Towels or rags

1. Measure the flat finish latex paint and unsanded tile grout into a container. See Tips for ratio of paint with other ingredients. Your project will dictate how much chalkboard paint you need to make.

2. Mix thoroughly using a paint stirrer, until they are very well blended and there are not any clumps.

3. Apply the paint to the surface that you want to cover using a paintbrush, roller or sponge. Make sure to allow the paint to thoroughly dry before applying another coat of paint.

4. Sand each coat of paint gently, using 150 grit sandpaper.

5.Wipe the dust away using a clean towel or rag. This will help to keep your chalkboard surface nice and smooth.

6. Condition your new chalkboard by turning a piece of chalk sideways and rubbing it over the entire surface of the chalkboard. Make sure that you cover the entire board with the chalk.

7. Clean the chalk off the chalkboard using a soft felt cloth. Dampen the cloth with water and wipe off the chalkboard.

8. Enjoy.

Mixing ratio tips:
•Mixing proportions for the chalkboard paint: 1 part acrylic paint, 1/2 part glazing medium and 1/6 part of powder tile grout. For example, measure 3 tsps. of paint, 1-1/2 teaspoons of glazing medium and 1/2 tsp. powder tile grout. Another example is 6 tsp. of paint, 3 tsp. of glazing medium and 1 tsp. of powder tile grout..
•Use a magnetic primer under your chalkboard paint for a magnetic chalkboard..
•If you are applying the chalkboard paint to a small area such as a section of a door, or message board, mix only 1 cup of paint, making more if needed. For larger areas, simply increase the amount of paint and un-sanded tile grout proportionally..
•Remember, grout dries quickly. Make your "paint" in small batches at a time as it does not keep well.

xoxoxo,

A little bit of vintage love...

So I am on a decorating and editig kick at home right now. DOn't ask me how one can have a desire to minimalize AND decorate at the same time but I do. I just feel a need to make home a place that does away with everything that is cluttered and jumbled. I want a place where I can think and relax and.... breathe. While on the search for hanging barn doors ( for a future project that you'll soon see) I stumbled upon these adorable images of old front portch screen doors turned pantry door. I love them! They are so vintage and cute. I am just sad I dont have a pantry like this but not too sad to share it with you. I know there is someone out there who this is just what they need! I hope you enjoy!


This one is from Country Living.

And this gem is from This old house.

Thursday, February 10, 2011

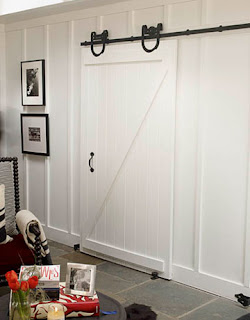
Barn doors....

...aren't just for barns anymore! No way. These darling pieces of architectural minimalism are incredible space savers and make the most boring walls look like masterful eye candy. Have a look see for yourself.


This one combines two of my obsessions at the moment- chalk board paint AND Barn Doors. Swoon!

This one is from Hose Beautiful


Better homes and Gardens

Wednesday, February 9, 2011

Old school style....


As I allow my mind to wander I have found myself lately getting lost in recollections of my school girl days. I LOVED drawing endlessly on the chalk boards. The slate black surfaces allowed for endless creativity. So it should come to you as no surprise that I am loving the resurgence of chalkboard decor popping up in design magazines, blogs and my favorite stores lately.

Here are a few inspirational images I have stumbled upon. Notice the chalk isnt just for the kiddos. In fact, I am certain the kids won't be drawing on these walls at my house (A mom has to have a few toys of her own right?) Check it out:


country living

Thursday, January 13, 2011

Transformation: From Eyesore to Fabulous

Do you have an item in your house that functions just fine but is a thorn in your decorator side? I do. Its my refrigerator. After the last one went kaput- Mr.Copycat and I decided to buy one from our favorite vendor- Mr. Craig and his fabulous list. 50 dollars and it was ours. (And it looked like it too!) Here's a picture of the way it looks now:

You see? I wasn't exaggerating. Its pretty hideous. That's why I allow all the art work and magnets... to act as a barrier to the ugly. Now you can understand, to my delight while browsing on the Internet today, why I was so elated to find this little piece of copycat fodder on the Blog of the Old Painted Cottage. It just screams, "You can do this!!! I will liberate you from your ugly refrigerator in a cost effective and (here's my favorite part) beautiful way!"Are you ready for it?

Isn't it brilliant? I love it all but I especially love the hardware. I'm a sucker for massive hinges and pulls. And after reading how she did it I'm excited because I think I could totally master this on a lazy Saturday. (Sorry Kids... next Saturday is now deemed Cooler Saturday. Anything you need to consume will be located in the designated cooler of the day.)
So what do you think? Is it worthy of a future dyi?

Wednesday, January 12, 2011

Did your heart melt....

...like mine did with joy when you saw this adorable chandelier from The Curious sofa? The neutral palate, the antique block print pages, the old photos..... This is deffinitely being filed away under future dyi.


Can you imagine inserting title pages from your favorite antique books, cherished heirloom photos and charming block prints of images that make your heart go a flutter- all on one gorgeous lamp? I will call it my amazing, luminescent, memory carousel. :)

Monday, January 10, 2011

Art Ledges....

...have completely taken over my thoughts. I am obsessed with them! I dont know if my obsession these past few days with them is unhealthy but it definitely borders on the insane. If you asked me what I love about them I wouldn't know where to start. Their versatility, their changeability, their functionality. The fact that you can place and replace pictures to your hearts content without turning your walls into Swiss cheese makes my comitt-aphobic soul sing.

And lets not even mention that once they're hung you never have to worry if another picture arrangement is level as long as you shall live! Lastly, I like being able to placee different seasonal found objects like topiaries, woodenships and letters!

Being a copycat, I had to scour the internet for some inspiration. Of course it was Pottery Barn that had exactly what my minds eye was picturing.

So here are a few that have caught my eye:

I love the simplicity and the track lighting of this art ledge from Pottery Barn.

DIY design inspiration at its best!
And how cute is this little office?
So, Where have you used art ledges? I'd love to know. Be on the lookout in the following posts for an upcoming copycat and how I use photo ledges in my own home.

xoxoxo,

Friday, January 7, 2011

January Copycat: Pottery Barn inspired winter mantlescape

I do enjoy the de-cluttered feeling that is left after all the Christmas decorations are taken down and put away. (This year I even managed to take it down by Dec 31. Which is a triumph over last years Christmas/Valentine's Day decor fiasco...) Yet after all the clutter is gone the house feels Stark and naked. My mantle is the first thing a person sees when they walk into my canyon home. It sets the tone and makes the first impression and it just seemed so, well, naked. I want to do something that reminds you of winter but not the holidays so I decided this month's copycat would be a winter mantle scape.

After searching the kingdom over for inspiration, my heart lept for joy when I found this beautiful Pottery Barn winter mantle scape:

Isn't it stunning? I love the layers, the mix of metals and winter white and the warm glow from the candles. There is just one problem- the eggs. I dont like them and they are deffintely spring not winter so I'll have to winterize it and make it my own. I also have a new years resolution that applies to this project. Mr Copycat and I have resolved to be better with our money this year so all Copycats big and small can enjoy more things together as a family. For me, that means a few less shopping trips and re purposing and reusing design items I already have to create my design visions for as little money as possible.
Lets take a look at the design elements from a copycat perspective:


So with my new year's resolutions on my mind and a list made from the items shown above, I set out to find the items I needed hidden in my house and buried in my garage.

I found everything I needed. A few years ago I had bought a twig candelabra that I just adored and painted it white. That will be my centerpiece. I also found a few candlestick holders- white wood, glass and pewter at garage sales and have used them all over my house. I also unburied a few apothecary jars and borrowed a few battery operated candles from my bedroom. As for the nature elements, I just nabbed a few twigs lying around beneath the oak tree in my back yard and tied it all together using a few pages out of an old book. Here's how it turned out:


And I put together a collage of my favorite parts:


Here's a side by side comparison:


I am so happy with my January Pottery barn inspired mantlescape and how it turned out and am now writing my post by its warm, wintry glow.

Thursday, January 6, 2011

Shamful Admission

I have something I need to admit. So, I'm going to admit it- right from the start and get it off my chest. I am not a creative person. *sigh of relief* There I said it. People may say I am but I am not. "But" you say, "you have so many creative things in your home. You design. You invent. How can you not be creative?" The answer is simple: I am a copycat. I spend hours online googling design blogs and other sites like pottery barn and restoration hardware and I store images I love from places like country home and better homes and gardens. The ones that make my heart sing, I deconstruct, tweak and copy. That's it. So, now that my dark secret is revealed I am now free to share with you the tips, tricks and tools of the copycat's trade (which, coincidentally, is exactly what this blog is all about.)

In the posts that are to follow I am going to attempt to share with you my decorating journey of turning the bare walls, naked windows, over-crowded and cluttered spaces into a beautiful, peaceful, and cozy home.

The posts may be infrequent, as having 4 kids at home can run me in 30 bazillion (ask my kids, its a number) different directions but I promise, when I do post, it will be informative, inspirational and insightful.

Wednesday, January 5, 2011

Copycat defined


When design is involved a copycat is one who imitates high end design studios and upscale decor on a shoestring budget, fabulously.